
Hi everyone!!
I was super-stoked to be asked to offer a blog post on my hack of the Rosie’s Ruffled Leggings pattern!
This is my first time ever writing a sewing related post, so I hope I cover all the important parts ☺
Just a quick run-down on me: I’m an Electrician, but I’m currently a SAHM with my 3 beautiful daughters (ages 4.5 years, 2 years, and 11 months). I’ve been blessed to be married to the most tolerant, patient man for almost 9 years! I discovered a love of sewing after inheriting my Grandmother’s Janome sewing machine 11 years ago, but didn’t start using it until 3 years ago (I still had it serviced every year, even though it only collected dust). I might have been slow to start, but I quickly fell down the rabbit hole of custom knit fabrics, and haven’t looked back!
Last week, Mama Can Do It hosted a sew-a-long sponsored by Simply by Ti Fabrics. I adore sew-a-longs! Not only does it give me the opportunity to purchase *another* pattern on sale, but I can try new designers AND it motivates me to finish, because…who doesn’t like the potential to win free fabric?!
I live in sunny (very hot) South East Queensland, Australia. And… its summer, so full length leggings just weren’t going to work out that well for me. During the sew-a-long, I realised that I could definitely deviate from the plan! This is an important realisation for me, because I’m usually SUCH a stickler for the rules.
To start with, I measured my daughter and printed out the pattern. After taping, grading out the waist, and cutting, I then measured my daughter’s inseam down to the point I wanted her shorts to sit. For my middle daughter, that was 5 inches. I then added in the hem allowance.
*This is important. Otherwise, the pants will end up shorter than intended…ask me how I know.*
I cut the paper pattern off at the appropriate length and then cut my fabric. I cut the bum ruffles as per the chart. I followed the tutorial right the way through up until it came to attaching the leg ruffles.
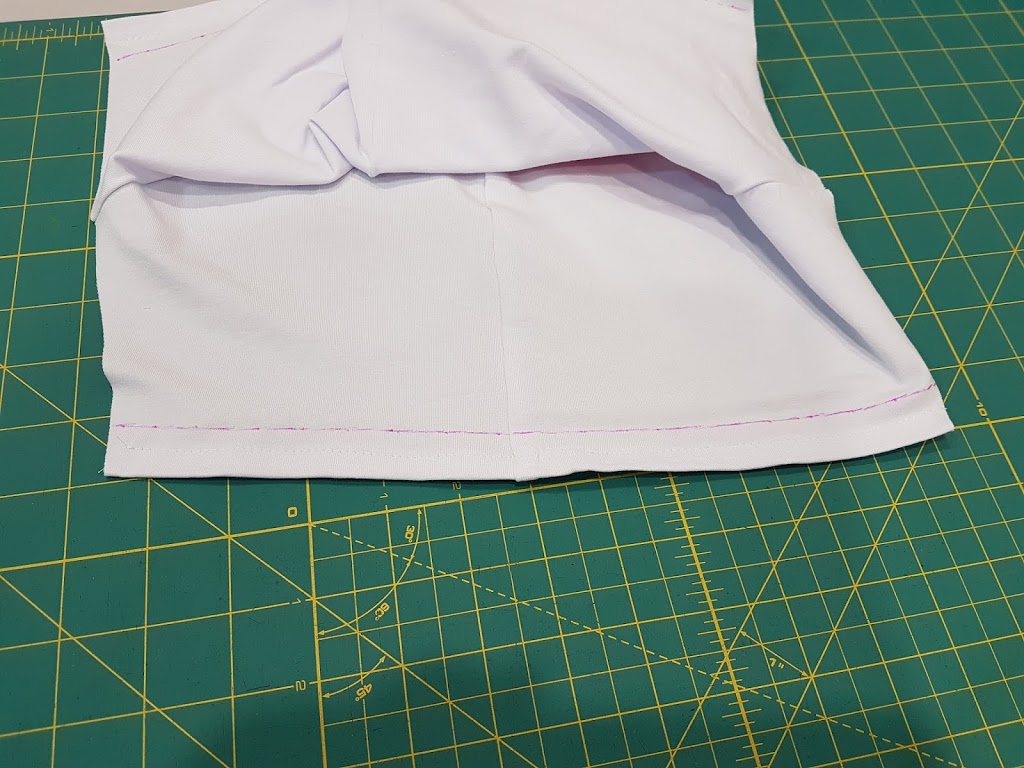
*Do not use the measurements for the ankle ruffles for your shorts hem ruffle. It won’t be long enough*
Because I am not awesome at math, I measured the width of the seat of the leggings (12″) and then measured the width of my leg openings (also 12″). In this instance it was perfectly fine for me to cut 2 x ruffles the same as the bum ruffles, but I will definitely be checking this with every pair I make. I ruffled the fabric to 13″ (to allow for error) because I didn’t want to end up with ruffles that were too short!

I measured up from the bottom of my finished hem, 3/4 of an inch. This is because the ruffles are 1.5″ wide, and I wanted the bottom edge of my ruffle to match the bottom edge of my hem. I drew a line with an air-erasable pen (same as with the bum ruffles) to guide where to stitch my ruffles.
After attaching the leg ruffles, I sewed up the inseam and continued to follow the tutorial to finish my shorts. As a side-note, on the Mama Can Do It sew-a-long Facebook page, there are video tutorials too! The construction is slightly different in these videos, but I think its always good to learn multiple ways to achieve the same result, so that I can pick and choose which technique works best for me ☺
Here’s my beautiful (scruffy) princess in her finished Rosie’s Ruffled Leggings/Shorts:

And let’s not forget the all important back of the shorts:
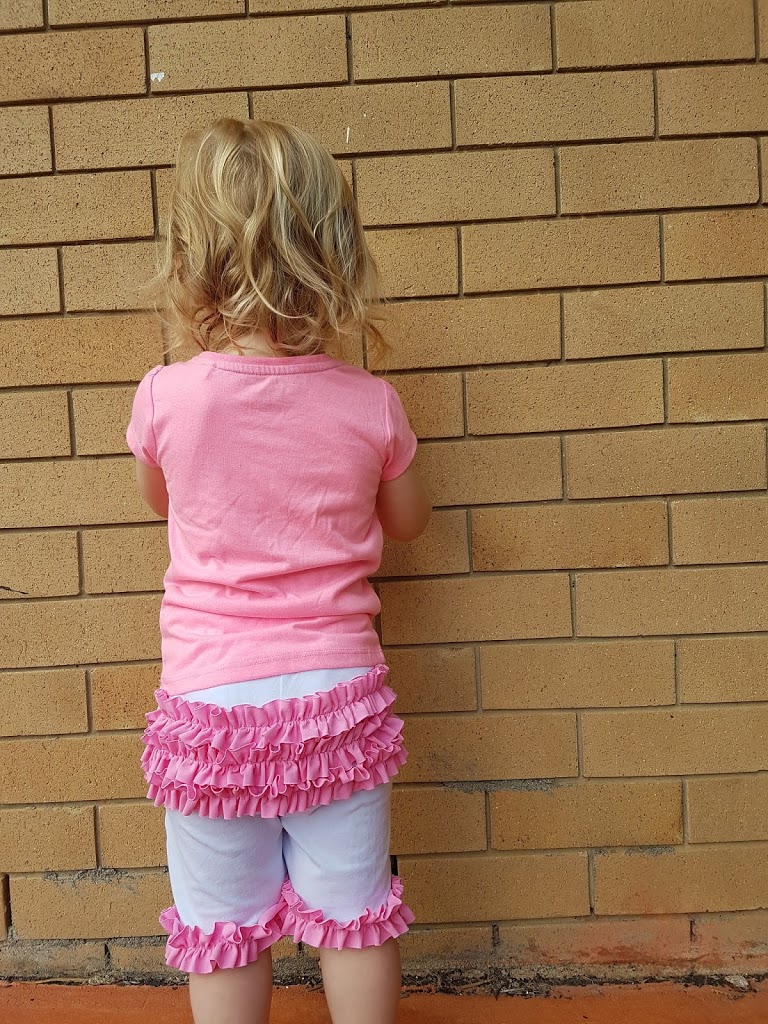
These pants were a looser fit than intended, only because up until about a month ago my beautiful girl was quite chunky and had a toddler belly. She’s since shot up and slimmed down, so the shorts don’t fit as they should. She has plenty of growing room now though ☺
*Disclaimer: I was not paid or bribed in any way for my post (Haha!). If, however, you’d like to have a squizzy around on Mama Can Do It’s page and find a fabulous pattern for yourself, please use this link (aff link): http://MammaCanDoIt.com?aff=106
Also, my photography game clearly needs work, but my love of sitting in front of my sewing machine gets in the way of learning how to take better photos ☺
Thank you for having me! It was a pleasure to write this post, and I hope it can help inspire you all to try a hack of your own!


