
One of the struggles of having a child (or in my case two) in cloth diapers is finding bottoms that fit well over them. One of the nice things about making clothes for my kids is that I can adjust patterns to suit my needs, including modifying them to fit over a fluffy butt. With spring in full swing here my kids needed warm weather clothes. I turned to Mamma Can Do It and the Breezy Shorts. This is a versatile uni-sex pattern designed for both woven and knit fabrics (a hidden gem in clothing patterns) with multiple lengths and finishing options.
One of the easiest ways to adjust for a cloth diaper is to increase the rise a little, about an inch unless you use really fluffy diapers for a heavy wetter. I mostly use one size pockets with a 5 layer bamboo and microfiber insert for daytime and my own one size AIO with 6 layer inserts (zorb cores), pretty middle of the road for cloth diapers as far as bulk. I found an inch increase in the rise enough to get over our diapers in both the woven and knit options I did not try the woven over an overnight diaper, but I did with the knit version and they still fit well. I will show you two easy ways to accomplish this.
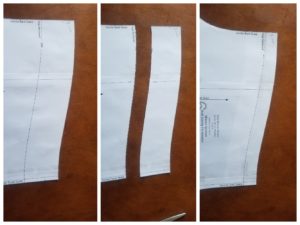
Because there are two rise options for the Breezy shorts (yoga or elastic waist) the simplest way to increase the rise is by using the existing pattern pieces and a yoga waist. Put together your pattern, cut it out at the high rise, then cut it at the yoga cut line. On the extra piece you cut off mark at an inch from the top at both sides, then lay your full piece on top of that and tape or glue down. If you use a really bulky cloth diaper you may need to increase the rise another half inch, especially for woven versions. From this point you cut and construction your shorts like normal.
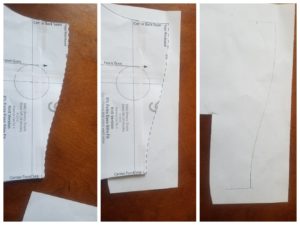
Option 2 is can be used with the elastic option and any simple bottom pattern. Like with the first option: piece and cut out your pattern. Next you will lay your pattern on top of another sheet of paper and trace around the top portion of the rise. Set your pattern piece aside and mark an inch down from the top of your tracing, then tape or glue your pattern down over your tracing, with the top of the pattern at your markings. From this point you trim off the extra paper and then construction your shorts like normal.
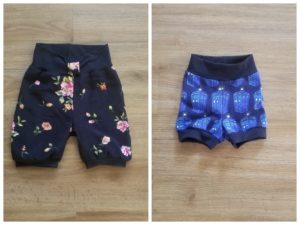
Sit back and enjoy your newly made, diaper friendly shorts! Then, of course, impatiently wait to wake your sleeping kids up to try them on.
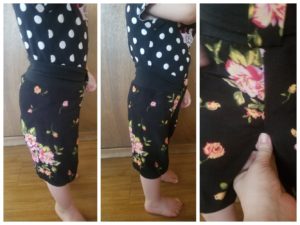
Our family keeps a few disposable diapers around for emergencies (also known as I forgot or was too busy to do diaper laundry) and babysitters who may be un-familiar with or reluctant to use cloth diapers. We’re a large family, so I will gladly put my children in disposable diapers if that means I get a few hours alone to unwind or get the very rare date with my husband. For curiosity’s sake I tried out our new shorts over both our daytime cloth and a disposable to see how they looked. From the front you can’t tell a difference, but the crotch does hang a little lower. You can see where I pinched the excess fabric.
One more thing before you run off to make all the options with the cloth diaper modification: Mamma Can Do It has two great dress patterns that you can pair with this for the little girl in your life: the Joyful Jumper and The Adalynn. Cut these at tunic length (ruffle hem on the Adalynn, without the ruffle) and you have yourself super cute outfits to make your little one with these great and easy to sew pattern.
Happy Sewing!
SaveSave


