
Hey y’all,
As some of you know, I’m pregnant! At this point I’m just about 35 weeks pregnant with my second… so I’m sure you can imagine how BIG and uncomfortable I am. Even maternity clothes don’t seem to fit me anymore, so I’ve been LIVING in my handmade maxi dresses. They’re perfect for pregnancy and postpartum! Especially the hack were about to look at, because you can nurse in it!!
So first, go grab your Relaxed Peplum Top from Mamma Can Do It!
It’s currently 25% off, along with the entire site, until Friday (9/21)!!

Usually when I think of “Hacking” a pattern, I think its most likely going to be super difficult, but this was SOOOOO easy!
Although I’d love to take credit for this tutorial, I actually got it from Kate Blocher, from See Kate Sew! You can see her original tutorial HERE.
I didn’t take pictures while sewing, so I will be extra vivid with my wording.
And I will use pictures from other tutorials of mine to help.
—————————————————————————————-
Nursing/Maternity HACK for the MCDI Relaxed Peplum Top
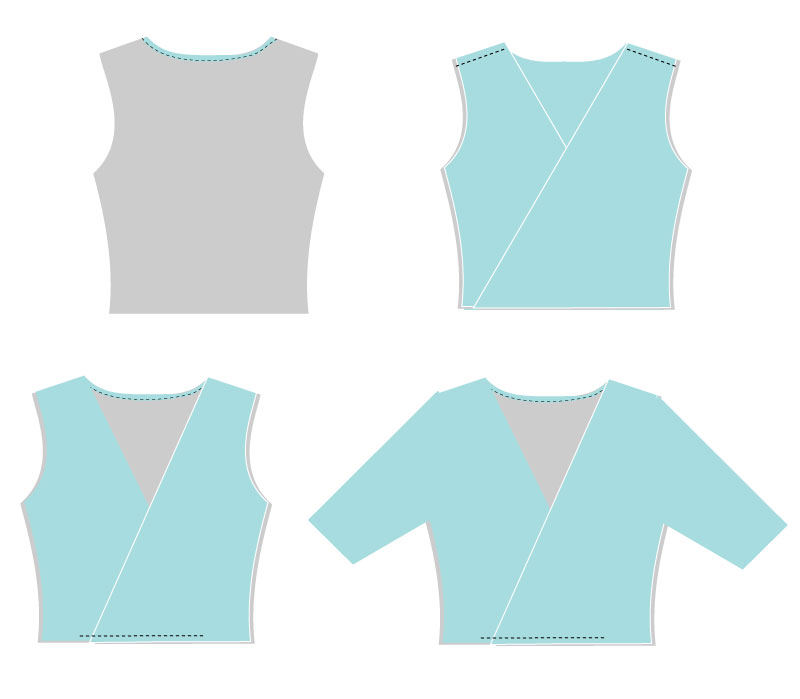
Step 1: Altering the pattern. Print out your peplum top from Mamma Can Do it (MCDI) and cut out your appropriate size. For this tutorial, you will ONLY need the front and back bodice, and whichever sleeve length you prefer.
You will need to remove about 4.5″ from the front and back pattern piece, this will create the empire look that we need to fit over our maternity bellies!
Next is the hardest part (which you will see is not that hard). Add about 6″ to the bottom, and draw a straight line from the shoulder to connect. The following picture is from SeeKateSew.com.

Your new edge will be used to cut on the fold. This makes it so we don’t have to do any bands or binding! YAYYY.
Step 2: Cutting the fabric. Like I said before, you will need 2 mirrored front pieces cut on the fold, 1 back bodice cut on the fold, and 2 sleeves cut on the fold!
For the skirt, it will all just depend on how tall you are, and how long you want your shirt to be.
For me personally, I fold my fabric together selvage to selvage, Then cut down the fold. You should have two long pieces of fabric now. I always alter at the end after everything is put together.
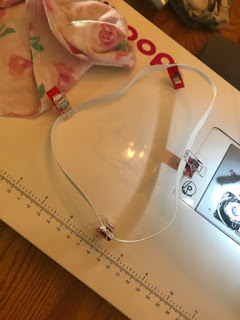
Step 3: Lets get sewing! Putting together the bodice. Take your back piece and look at the neckline you will fold down about an inch (wrong sides together) and stitch it down using a zig zag stitch.
Now we will connect the front bodices to the back. Attach the pieces at the shoulder, right sides together. Make sure you keep the front bodices folded.
Next, the sleeves! Attach the sleeves just like you would for any pattern, with right sides together fit together the armscye like a puzzle piece and sew together.
Now sew from the sleeve to the bottom of the bodice. It should resemble a little jacket now.
Put it on and cross the front bodice on top of each other. Use pins to stick it in place where you would like it. Make sure its not too tight around your torso, and make sure the “V” from the wrap is where you want it, so its not too high or too low.
Use a basting stitch to make it all one piece. Make sure not to include the back bodice when stitching together.
The following picture is from SewKateSew.com
Step 3: Assembling the skirt. So we have 2 long skirt pieces in front of us. With right sides together sew down the selvage on both sides. This will give you a long tube. Now we will use elastic to gather the skirt, I will now include pictures from a different tutorial of mine.
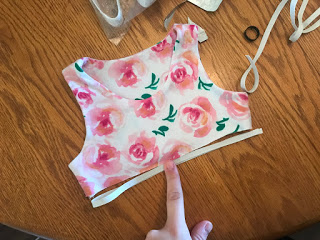
Lay bodice down and fold elastic in half so it is the length of your bodice x2.
Stitch the ends of your elastic together to create one big circle, and then divide your elastic into 4 even sections.
Now divide your skirt into 4 even sections and attach it to the elastic.
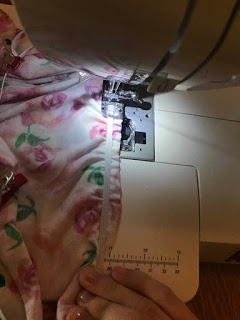
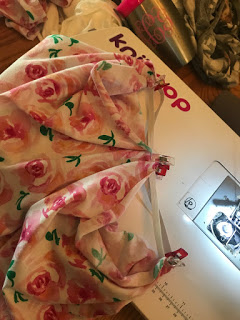
Using a basting stitch pull your elastic straight and stitch the skirt onto the elastic. This will cause it to gather up nicely. You may have to pull the elastic through your machine to help it feed through.
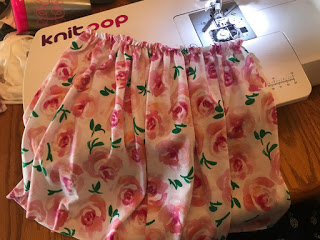
This will be your finished shirt look. Time to attach it to the bodice!
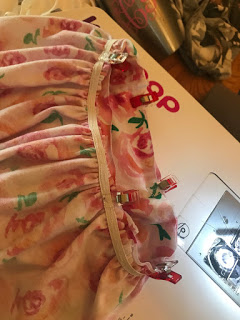
Step 4: Attaching the skirt to the bodice. Turn your skirt inside out and place your bodice inside RST matching up the raw edges. Pin in place, then use a zig zag stitch to connect. Sew on top of your elastic and pull it through the machine to help feed it.
Turn your bodice up and right sides out and you are done!
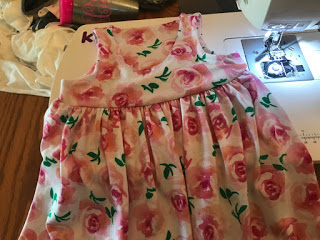
Put on your new dress and alter the bottom according to your height. Hem the bottom and sleeves and you are all finished!


Please reach out of you have any questions!!
Make sure to grab your peplum top pattern HERE!
xoxo,
Annie
**All links above are affiliate links, meaning that if you purchase through my link I will receive a small commission which will go towards fabric to make myself and my daughter clothes!**


