Hi everyone! I love this dress! There are so many ways that you can make it uniquely yours and did I mention that it has pockets!! It also has wonderful instructions and reference points on the sleeves and bodice to help you line everything up perfectly. She really thought about it all through to make it so easy to sew it up easily.
I chose to do the ruffle on the bottom of the skirt, but I wanted to do a rolled hem instead of a traditional fold over hem. I decided to do this for a couple of reasons. First of all, it is a stitch that I have actually managed to master on my serger and I love how it gives it such a nice clean finished edge. It is also great for a “softer” lightweight knit like the cotton/lycra blend knit that I chose. It gives it just enough weight to hang nicely without allot of bulk. The second reason is that I really don’t like to iron….I mean REALLY don’t like to do it, especially on knits. I always manage to steam about 3 of my fingers and my iron tends to spit at me and on my fabric. So, here is how I did my rolled hem modification.
You will cut out your ruffle pieces according to the measurements given. I didn’t trim the height of my strips down because I like the wider ruffle, but if you wanted your finished ruffle to be a little narrower (more like the version with the fold over hem) then you will just trim from 3/4″ to 1″ from the height of your ruffle strips depending on how much of your strip gets taken off when you are doing the rolled edge.
Once you have your strips cut out, you will check your serger manual for the settings for a rolled hem on your machine (I still have to check mine every time, I just can’t seem to memorize them.) and then serge away! It is much easier to finish the bottom of the strips before you gather and attach them…..trust me on this one, I did it the other way around and it is hard to maneuver all those gathers and the dress around a serger. Here is a picture of one of the strips with the rolled edge on the bottom.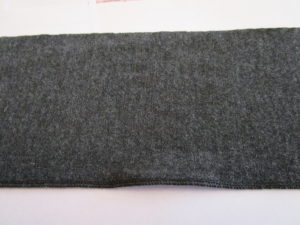
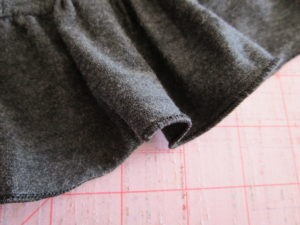
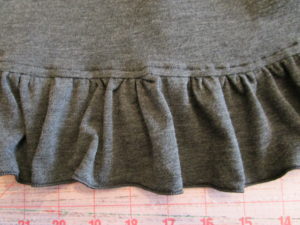
The next step after you admire your awesome rolled edge hem for a few minutes will be to gather your ruffle pieces, and attach them to the bottom of your dress as stated in the pattern instructions. Below is a close up of the rolled hem. I use regular thread in my needle and lower looper, and the bulky/wooly nylon type in the upper looper. It really seems to help give it a nice polished rolled hem. If you only have regular thread it will work fine for this as you really don’t need any stretch in the bottom of the ruffle. The other is a picture of the outside of the dress with the ruffle attached and the top stitching done. That top stitching is great and really helps keep your seam allowance in place and your ruffle looking nice.
I love the finished look. It is just feminine enough without being too girly and it really helps finish off the bottom of the dress.  Thank you for stopping by and checking out my post!


