Disclosure: This post contains affiliate links, which has no added cost to you.

Everyone needs a good T-Shirt pattern in their collection and Mamma Can Do It has answered the call with their new Classic T-Shirt Collection with a size range from newborn to 40W. How awesome is that?! Not only are these patterns great for a basic tee, but they’re incredibly fun to hack and add flair to.
Let’s Add a Hood!
My kids absolutely love hoods. If I could put a hood on every shirt I make my kids would be over the moon. I decided to try my hand at adding a hood to the new t-shirt pattern by tracing the hood on a purchased hoodie.
Adding a hood eliminates the need for a band, so I made sure the hoodie I used was long enough at the base (where it is sewn in) to overlap when attaching to the shirt neckline. I used the neckband piece from the pattern to compare hoods until I found one that would work.
Getting Started
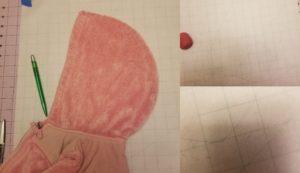
After I found my hood I taped a piece of parchment paper down onto my cutting mat and laid the hood down, folded in half and as flat as possible. Use weights to hold it in place and prevent shifting and trace the outside edges. I used a small pin to mark a couple places along the curve where it was sewn in and connected the holes, but you can eyeball it too. After the tracing is done add your seam allowance to all sides: I used 1/2-inch. You can make a deeper hood by adding at the front (straight edge) and increasing the overlap at the front.
I opted for a single layer hood, but you can easily use the same pattern piece to create a lined/double layer: this creates a heavier, thicker hood, but hides all seams. To begin construct your shirt per the pattern instructions, omitting the neckband.
Cutting and Construction
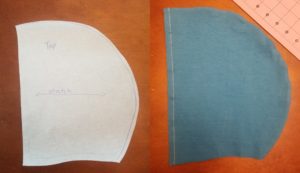
For the hood cut two mirror image pieces from the pattern created: this is done by either cutting one piece then flipping the pattern over and cutting another or by folding the fabric in half and cutting both pieces at once. With right sides together sew along the back curve using your desired seam allowance. Then turn under and hem the front of the hood. Pin the back seam off to the side you turned it when hemming.
Finishing Up
Overlap the front edges and pin or baste together. You can check the length against the neckband pattern piece, remember to eliminate the seam allowance. Next, mark the quarter points of the hood (back seam, center of overlap, then halfway between the two on each side. Pin the hood to the neckline of your shirt using your quarter points then sew or serge on. You can topstitch if desired, I do so the hem doesn’t flip up.
Lined Hood
If doing a lined/double layer hood the process is nearly identical. Take your pattern piece and cut 4 mirrored pieces: 2 main, 2 lining. Sew the back curve for each set with right sides together. Place the straight edges of the hoods right sides together and sew using your seam allowance. Have the seams turn opposite of each other because it reduces bulk. Topstitch if desired. Make sure the outside of the hood is against the right side of the shirt, otherwise your lining will be on the outside.
Pockets
 I also made one with inseam pockets using the Adalynn pockets for my kiddo that insists everything has pockets (what better way to sneak rocks into the house?). To decide where to place them I measured from my child’s armpit to natural waist: placing the center of the pocket at this point on the pattern because that keeps the pocket high enough to stay out of the hem.
Bands
I was short on fabric. My solution: add a bottom band and banded the sleeves to create continuity and tie it all together. Plus, no hemming! To add loose sleeve bands measure the sleeve opening and subtract 10% to determine band length. The bottom band I subtracted about 15% to make it a little more fitted and cut 5″ wide. My next task is to make them all Fit Pants so their entire outfit is MCDI patterns!


