
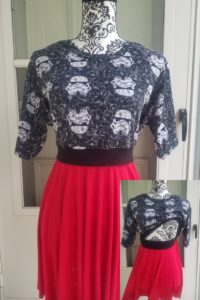
Have you tried the new peplum from Mamma Can Do It yet? I have, and I absolutely love the women’s versions I’ve made for myself and the girl’s my daughter. I did run into one roadblock though: I am still nursing my youngest which is a little difficult with the this top as written. I had two sewing options for creating a nursing-friendly version: lower the neckline so I can pull the shirt down or adjust the bodice so it split at the peplum. Both are great options for nursing moms, but the split prevents stretching out the bodice (important for 2-way knit since there’s little to no recovery) and allows for more modesty if that is something you’re concerned about. I normally just lower the necklines, but I wanted to try something new and fun.
**Important Notes:** The construction steps do change when doing this modification, so please read this all the way through before attempting. Also, for this tutorial when I use the word “peplum” I referring to the bottom portion of the shirt, which is technical/sewing term for this piece.
The fabric for at least one of the bands needs to be a 4-way stretch with good recovery. I chose an athletic performance cotton spandex (91/9) for my bands. It is actually my preference for all bands (pants, underwear, etc) because it has amazing stretch and recovery from the higher spandex percentage. If you choose to use a 2-way stretch fabric or something with poor recovery I suggest threading elastic in the band on the peplum to prevent a gap (optional for the bodice band).
Ok, let’s get started. The first thing you need to do is decide your finished band height and what seam allowance you’ll be attaching the band to the bodice to determine how wide to cut it and how much to adjust the bodice length. I chose 2-inches with a 1/4-inch seam allowance, so my band needed to be 4.5″ tall (2 inches plus two 1/4 inch seam allowances). For the width I measured the width of my front bodice piece and multiplied by two then subtracted 10% for the bodice and 15% for the peplum. I did this to ensure that the bodice had a good fit, without gapping or sagging (you’ll use the same lengths if adding elastic).
To make this easy let’s say my bodice piece is 10″, multiply by 2 and you get 20″. You can subtract your percentages two ways: use a fancy calculator and just type it in (20 – 10% = 18) or multiply by the decimal representation of the total length you need, so for 10% you need 90%, the decimal representation is 0.9 of 20 (20 x 0.9 = 18). Do the same thing for your peplum band (20 – 15% = 17) or (20 x .85 =17). You can shorten the peplum band a little further if you are concerned, but I wouldn’t recommend more than 20% (.8 if multiplying) unless your fabric has a LOT of stretch. So in this scenario the bodice band is 18″ by 4.5″ and the peplum band is 17″ by 4.5″. Now to adjust our front bodice.
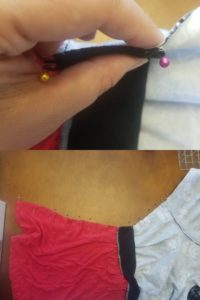
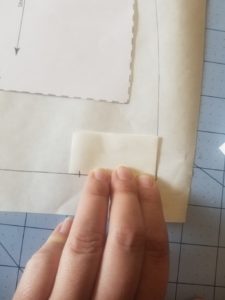 I traced my entire front bodice on freezer paper (printing a second would work as well) because I plan to make more with and without the nursing modification for myself. I cut a narrow piece of paper 4.5″, folded it in half, marked my seam, and placed it at the edge of my traced front bodice piece with the fold at the bottom because this is how the band will be once complete. From there I marked the seam allowance on the edge of the bodice so I knew where adjust my pattern. You can calculate this out too, but with sewing I prefer the visualization because then I know my modifications like this will be wearable.
 Using the marking and straight edge re-draw the bottom curve. I did this versus cutting straight across because not want to loose the shape (which allows room the bust) and I had to grade my bodice piece down three sizes to my waist wanted to save the original pattern piece. Cut out your new front bodice pattern piece. I made no adjustments to the peplum and you can use any version you want. Now it’s time to cut!
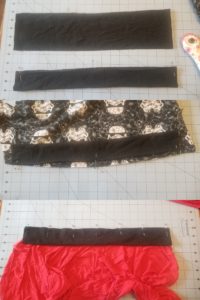
Cut all your pieces out. You should have all the pieces listed in the pattern, plus your two additional bands. Make sure transfer all of your pattern markings, plus mark the center points of the bands. Finally, it’s time to sew!
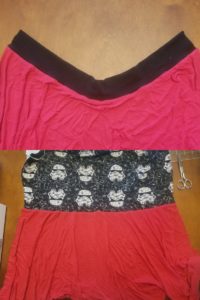
We will start by attaching the bands to the bodice and peplum. If you selected one of the gathered options, gather first. Fold the bands in half lengthwise. Pin or clip in place: start with both ends and the center, stretching the bands as needed (be careful to only stretch the bands). Sew or serge the bands on and topstitch if desired: I chose to topstitch the bodice to help it lay flat, but skipped it on the peplum. Sew the second peplum piece to the back bodice.
Sew the shoulders, sleeves, and neck binding using the instructions in the tutorial. We’re almost done, just two more seams and hemming! If adding elastic in the bands, now is the time to do it: just thread elastic of choice in the band and tack down each end. With right sides together: Pin sleeves and bodice pieces together, the bottom of the band should end at the seam for where the peplum and back bodice meet. To prevent the slipping I had (I pulled my pins too early when serging) you can baste the band in place with your sewing machine. Now pin the front peplum: the bands should overlap to close the front of the shirt and bottom edges should be even. Repeat with the other side and sew the side seams. Be careful when going over where bands are layered to prevent shifting and skipped stitches. Hem the sleeves if you didn’t already as well as the bottom edge.

 Don’t forget the obligatory selfish sew selfie!
Happy Sewing!
This post contains affiliate links. By making a purchase through an affiliate link I may receive a small percentage of the sale which allows me to, in turn, buy what I need to make cloths for my kids.


