Hello amazing sewists! 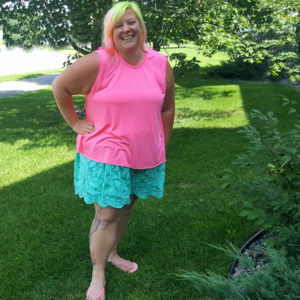 My name is Julia, and I am here visiting from Brave & Snarky: My Self Acceptance Journey. I had the pleasure of sewing up the adorable Sunflower tank for the re-release with plus sizing. If you don’t already own the pattern, please consider getting yours using my affiliate link here (if you choose to use this link, I will earn a small commission at no extra cost to you – this helps fund my sewing habit). It’s a quick, easy sew, and I’m so excited that it is now released in my size. This tank is comfortable, cute, modest and flattering…
But when I put mine together I decided it needed a little extra something, as you can see in the picture above. I used a lightweight solid pink jersey knit because my closet needs more solid tops, and it was a little too plain for me (I’m a wild child at heart). I decided to add a ruffle to the bottom and it brought the Sunflower to the next level for me! Because I loved the effect, I put together a little tutorial for this hack to take the guesswork out of it for you. My measurements are all in inches for reference, but you can easily use cm. Also, this pattern has multiple length options – I chose to make the tunic length, but this would be super cute on any of the dress lengths as well!
Let’s get started! Once you have your pattern assembled and fabric cut out:
- Follow the pattern assembly instructions through sewing the side seams, and stop before hemming.
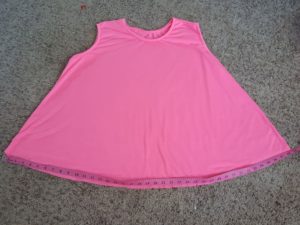 2. Lay your garment out and measure the bottom hem from seam to seam. Multiply this measurement by 4. For my tunic version (made in size 24 graded to size 30 hips), the measurement was 39”, so 39×4=156”. This will give you the length of ruffle you’ll need if you want it to be the same fullness as mine. You can also choose to make the ruffle longer or shorter, based on your preference for ruffly goodness (longer will result in a fuller ruffle, shorter will give you a less ruffled effect).
3. Choose your desired finished ruffle width (how much added length you want with the ruffle added), then add upper seam allowance and hem to that width measurement. For mine, I wanted a 3” finished ruffle, so added .25” for seam allowance (different from the pattern seam allowance just to make my math easier) and .5” for the hem, bringing my total width to 3.75”.
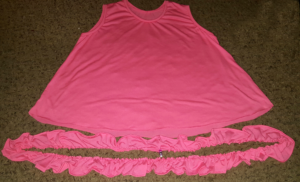
4. Cut strips of fabric following the same grain as the bodice pieces (most stretch on the length of the strips) to equal the measurements you calculated in steps 2 and 3. My fabric is 60” so I cut two full strips plus a 32” strip, all 3.75” wide, to equal 156”. I chose not to add any extra for seam allowance, but you can choose to add it if you’d like. Doing so would add slightly more gathering to the ruffle.
5. Sew together the short sides of your strips to make one long strip. Fold up 1/2″ and press your hem along one of the long sides of your strip (this will be the bottom of the ruffle), then stitch the hem. Sew the ends together to make one long loop.
6. Sew two rows of straight basting stitches at the top (unhemmed) side of the strip. Pull bobbin thread and gather fabric to match the width of the shirt hem. If you’ve never gathered before, work slowly to avoid breaking your thread and be sure to keep moving the gathers to keep the fabric moving easily.
Helpful hint: you can also do this step with elastic if you’re good at using elastic for gathering. I am not, so I chose to do it this way, but it is an option.
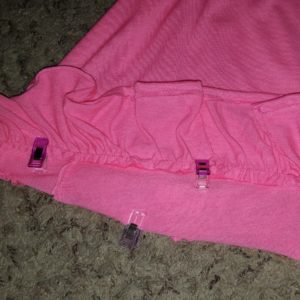
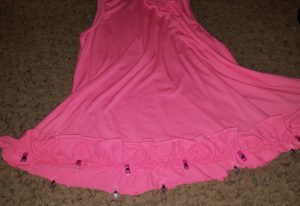 7. Turn the ruffle inside out and the shirt right side out. Even out the gathers as needed. Pin or clip the top of the ruffle to the bottom of the hem, right sides touching.
8. Sew together with the seam allowance you added in step 3. If you use a .25″ seam allowance as I did, you will also need to remove the gathering stitches afterward. Press the seam up and topstitch if desired (I chose not to).
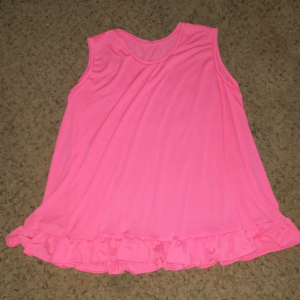
That’s it! It should now look something like this:
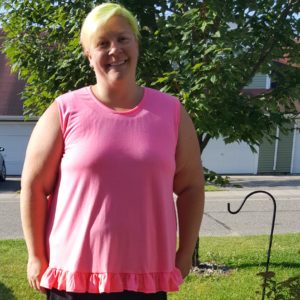
Enjoy your gorgeous tank, and the feeling of empowerment that comes with making garments that fit you and your style!
Tried this ruffle hack, or another hack? I’d love to hear about it in the comments!


