Hello my fellow sewists! My name is Gaby and here visiting from Craftstyle Living. I had the pleasure of testing the amazing Priscilla top that was just released this week, I enjoyed making it and my daughter loved the final look! Today I will be teaching you how to hack a Cold Shoulder look using this amazing new pattern.

Cold shoulders are on trend right now and the look is very easy to accomplish. For this tutorial we will be using the Priscilla Handkerchief Top. You can purchase the pattern Here.
Let’s start with the regular pattern pieces. Piece them together and grade it, the way you usually do. Pro-tip: choose your size based on your bust and then grade everything else from there. Choose from either short, 3/4 or long sleeve for this tutorial. Once you have chosen the sleeve, you will need to measure how much shoulder you. For the Priscilla Top you will measure from the shoulder down towards the arm. Some patterns will have that shoulder line different and should be adjusted accordingly. Grab the measuring tape and measure from the shoulder down to a point where you feel comfortable, now decrease by .5 inches to account for the band binding. Pro-tip: it’s better to be conservative in this step since is easier to cut a larger shoulder later. Measure from the top center notch down and draw a line across it. For my example I decided to have a 3 inch long cold shoulder.
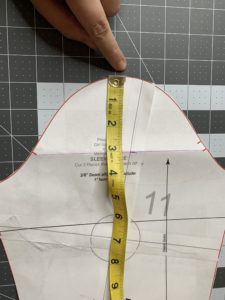
Pro-tip: There is no need to cut that line, instead fold it so you could use it for other garments. Now, we need to start thinking on the binding for the cold shoulder. Grab a piece of ribbon, yarn or measuring tape and measure around the dome of the original sleeve and including the base (the purple line on the picture). In my case, this measured 17 inches.

Now let’s take a deep breath to do some math! You will grab the measurement, 17 inches, and you will multiply it by .85 which is equal to 14.45. I rounded it to 14.5 for ease of cutting. Cut a piece of binding measuring your total, in my case 14.5 by 2 inches. Now that was the most complicated part, and there was no need to sweat it. You can now calculate binding for any project! Pro-tip: increase the length of the arm binding pattern piece provided match this measurement, this pattern piece will now work for two different bindings by simply folding it. I added the difference with a piece of scrap paper and will be able to use this pattern piece for the sleeveless option by folding it later. Once thats done, go ahead assemble the shoulder seam and the side seam. You may also add the neck binding for ease of sewing.
Sew the arm pieces close. Insert the arm piece inside the shirt (while inside out). Making sure that both pieces are right sides together. Now this is the important part. Make sure to pin the arm seam to the side seam to create a more professional look. You will notice a U shape from the arm seam to the point where the shoulder was cut. Pin both side of the “U” down and nothing else! This will look very loose and quite large after you do it if you try it on, but i promise you the binding will make it work.
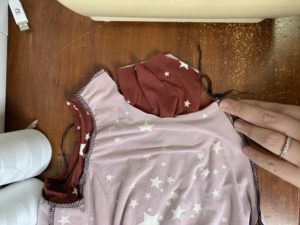
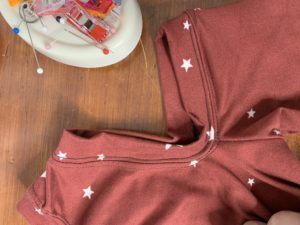
Once you have attached both sleeves, grab the binding, pin it in quarters and slide it inside the shoulder hole right side together. Now, make sure you pin the seams of the “U” from earlier, since you want to make sure those unions are caught properly and sewn correctly. Nobody likes holes in garments. Attach the binding using your preferred method. I used my serger to attached the binding and then my cover-stitch to top stitch it. Lastly finish sewing the hem as explained in the pattern.
There you have it! You can now enjoy your amazing cold shoulder Priscilla Top!
Next week, I will teach you how to include pockets!
If you would like a video tutorial, here is a youtube video explaining everything in detail. This blog contained an affiliate link, this means that if you purchase anything in the site after clicking it, i will get a small commission. This does not cost you extra but it does allow me to keep providing tutorials!


