Nothing is more frustrating then working hard to make a lovely top for yourself and having it NOT FIT!!! One of the hardest areas to get a proper fit is in the bust area. When I first started sewing and buying patterns I assumed that if I used my full bust measurement then the pattern would automatically fit. The problem I ran into was if it fit across my bust-line, it was WAY too big through the shoulders, neckline, and sleeve areas. If it fit through the shoulders, I’d get horrible pulling on the sides, the seam would go on an angle forward, and the front of the shirt would be much higher, because it has greater topography to go over. It was really depressing. I’d double check my measurements, where did I go wrong????
What I didn’t realize is that most patterns are drafted for a B or C cup. There are a few indie pattern companies that design for a D cup, and a few others that have cup size options built into the pattern. For the most part though this is not the case, and you really don’t want to have to miss out on some amazing patterns just because you don’t know how to make that adjustment on your pattern.
So what measurements do you use??? Well the best way to get a proper fit all over is to use a ‘high-bust’ measurement. You put the tape above the breasts, under the armpits, and this is going to give you a great idea of your ‘frame size’. If you’re larger then a D cup then this is going to make a huge difference in fit for you.
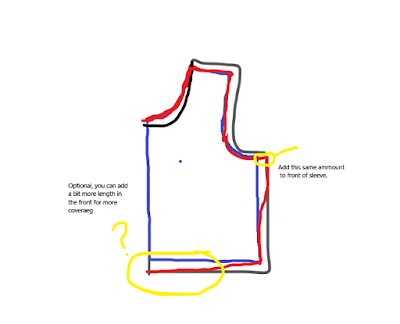
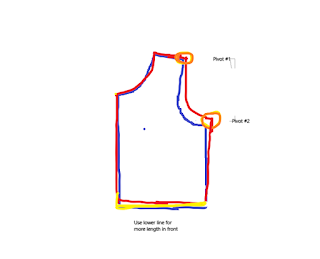
There are a ton of different Youtube and blog posts on how to do FBA’s. Most of them include some sort of dart. If you’re making a fitted woven pattern, then for sure you should do a proper FBA with darts, BUT knit fabrics give you a bit of leeway. I don’t really want a dart on my knit, and it’s not as fussy. There are a few ways you can go about adding more room, just where you need it. Depending on your cup size, you might only need to do one, or you can split the difference and do both if you’re larger. Here are 3 methods you can use, just see which one you like better. I apologize for my horrible paint skills, but hope the graphics help.


“Pivot FBA” : I think this one is probably a better choice, because it preserves the neckline and arm scythe. What you do is lay your pattern on a large piece of paper. You want to trace the front fold, and then up through the neck and shoulder area. Then you need to decide how much you want to add to the side. A general rule is 1cm per cup size over B cup. So if you’re a D then 2cm’s out. My problem is that I wear an H cup. so this can really throw off the shape of a top. (That is why I like to combine the pivot method with the slash method I’ll describe below.)
Once you’ve marked how far over you need to move your side seam you hold on to the top corner of the sleeve and slide the bottom part over to meet that mark, and draw in your arm scythe, now it’s the same size for the neckline and arm. Then you hold the underarm corner and straighten the pattern out till it’s parallel to the front fold line, or if you don’t want a little added room at the waist you pivot it so that the bottom of the waste lines up with the original front. Now when you look at the pattern you can see there is more room, but it’s mainly in the bust area, not all over. You’ll also see that from the angle you’ve added a bit more length to the front as well.
“Slash FBA”: This method is pretty fast and easy as well, and can be combined with the other methods or used on it’s own. Basically all you do is cut your pattern horizontally right through the bust-line. (usually about an inch below the armpit). And then you just slide it down how ever much you need. Remember knit is forgiving, you might have to


room for your breasts. If you only spread it about 1/2″ or so you can probably get away with just stretching the side of the back to line it up, any more then that you really
should either gather just the top 3″ to fit the back side length, or you can cut a gentle swoop up the side to keep it the original length.
I wear an H cup and added 1.5″ to the front of my pattern with the slash method, and I also pivoted out to the side about 1/2″. Do the pivot or grading part first, then do the slash if combining. This fit great!!!


This is the Relaxed Peplum Top Womens with half circle skirt from Mamma Can Do It.
Check out my review on the pattern here Momma Can Do It — Peplum Top — Pattern Test


2 thoughts on “Full Bust Adjustment–What every sewist should know.”
Thank you for these. I remember my mum used to make a vertical slit in the pattern from below shoulder seam almost to,waist and spread the pattern out about 1.5″, this resolved the problem with difference in length.
Thank you. This explains a lot!!!! If I had a good fit across the chest, then the shoulders were too wide!,